It takes a long time to create heirlooms. Photos and information on this blog are not free to be pinned, copied, or transferred without my permission. Please be cyber savvy and ask before taking.
Showing posts with label Fascination. Show all posts
Wednesday, January 11, 2012
#10 Fini-new photo
Tuesday, January 10, 2012
Make a note....
If you are planning on working this design, write this down......I am not done with the design but I used 2 skeins of Marlitt (will have some left), one skein of Threadworx (will have some left), and not using the Perle to go around the outside with the four sided stitch, and now look very closely........I was on the second spool of Kreinik #4 and on the home stretch of finish all the background around all the outside of each motif.....duh?! I ran out again......Write this down......3 spools of Kreinik.....not one, not two, but 3........so I am going through the ort bag....yes, really.....I am going to find enough in there to finish that tiny area on the bottom left or else.....stretching it has come to mind.....standing up and pulling all my hair out has come to mind.....and a lot of new swear words.......back to ort bag diving.....a new art!
Monday, January 9, 2012
More on Lesson Five
I am working on the pattern around the outside of all the motifs and got a little more than half done. It is all done with a single strand of the Kreinik #4 and does not show up well in the overall picture, but
this is a very closeup and I modified the color so you could see that it is creating little boxes all over!
Sunday, January 8, 2012
Back to the Mystery
Yippee! Stitching again.....I finished the Kreinik metallic in Motif #4, bottom right. I then went and finished the side triangles that are worked with the Needle Necessities and the Marlitt, so those are finished! I am moving right along again!
Tuesday, January 3, 2012
3 side patterns
So I worked on the side patterns.....in between the corner patterns....but only the Needle Necessities part! I did get the thread in the mail this afternoon, but decided I had gone this far without it......so I will finish all the NN and then come back and do the Marlitt.....right after I finish filling in the Kreinik #4 in Motif 4......all of a sudden, I feel like I am a long ways behind on this??!!
Pattern availability: I will let you know again that this pattern is no longer available....I am sorry to say....unless you find one on ebay or request one through some of the chat lists and can get it, I don't have any other ideas/options for you.....mine was spoken for a long while ago as is Lara's. This is the unfortunate part of Loretta's patterns...they are very hard to come by......Good luck with the hunt.
Monday, January 2, 2012
Squaring the design
I got all four corners stitched to start "squaring" the design area. Each corner is worked in alternating rows of Milanese with either two strands of the NN or the Marlitt. I will also run out of the Marlitt, so if you are planning on doing this design, buy more than one skein....I have not done any ripping out so you know, it just takes more than the pattern calls for. I started each corner area in the center of the design and worked out so that they would all be perfectly lined up.
Barbi commented that this is much like Samarkand Tiles by Anna Pearson....
here is the link.....take a look and see what you think...scroll down the page a bit!
http://www.needle-point.co.uk/design_catalogue3.htm
Barbi commented that this is much like Samarkand Tiles by Anna Pearson....
here is the link.....take a look and see what you think...scroll down the page a bit!
http://www.needle-point.co.uk/design_catalogue3.htm
Friday, December 30, 2011
Progress on Fascination
I did the center of Motif #4 which is identical to the one in number 1 and then I started the diagonal over one background. Here is where I ran out of the Kreinik #4....which is on order
Here is a picture of all four motifs.....now an 8 x 8 design on the Congress cloth
So I moved on to Lesson 5 and started in the top left corner. We are doing a Milanese stitch using two strands of Needle Necessities and two strands of the Marlitt in alternating rows. This will be worked on all four corners to "square the design"". Again to make sure that I get the sheen and can control both fibers, I am using my laying tool. As I finish each stitch of the Marlitt, I hold it down with the tip of the BLT-best laying tool-while I bring the needle up in the next stitch. Some people dampen the Marlitt to control it....sometimes I do, sometimes I don't.
Nancy asked about the project name and identification.....if you look below my notes you will see that I label each post with the designer name,Loretta Spears, and the name of the project in this case, both Fascination and Mystery #10. Hope that helps
Thursday, December 29, 2011
Motif 4 patterns
Pattern 5 is worked with both the NN and Marlitt....you can really see the sheen in this one
Pattern six is worked in all NN and is a satin stitch pattern that goes from a diamond to a square and seven
is more horizontal satin stitches working the NN first and coming back in with the Marlitt over two threads to create the top pattern
Pattern 8 is all NN and I even changed it a bit to add center stitches in the boxes that were created so as to more fill it in. I will work on the center motif for this motif tomorrow!
Wednesday, December 28, 2011
Motif #4
The first pattern is a tied stitch in NN and then surrounded by Marlitt
The second stitch was all worked in two strands of NN. The 3rd large square is worked with half NN and half Marlitt satin stitches
The fourth square is worked in Scotch stitches in NN and half a Scotch on top to create the shapes.
If you are going to work this design, please note both Lara and I think you will need two spools of the Kreinik #4 braid and two skeins of Marlitt. We are not sure yet about the NN and will keep you posted.
And.....don't forget somewhere around the 1st or so,the combination of this blog and the old one should total about 200,000 reads.....if you leave a comment, I will be doing a give away and will use the comment closest to the 200 mark......more details on this later and I will keep you posted as to when we might hit that mark!
Tuesday, December 27, 2011
Motif 3
I finished the center pattern and background of Motif 3. The center star is worked the same as Motif 2 and of course the background is the same as the other two. Below is the overall appearance so far. For the contrast in colors be sure and check out Lara's blog: diet pepsi and xanax on my sidebar. Remember she is working this same design in pinks!
Tomorrow, I will start Motif # 4!
Saturday, December 24, 2011
All the patterns
I finished all the patterns in Motif #3 which is directly below Motif #1. The largest one on the left is done like the one on the right except the center stitch is larger. The other two above and below it are worked in NN again. The little ones were here and opened their presents.....so excited! I am sure they are now snuggled in their beds as they know Santa is on the way......in fact....that may be sleigh bells I hear outside now! I guess I had better head their myself!
Friday, December 23, 2011
Starting Motif 3
I started at the top of Motif 3 by doing satin stich NN and then a patterned satin in Marlitt. Pattern two is all worked in NN. Three is first an upright cross and then is backstriched in Marlitt. Pattern 4 is all worked in NN and is a slanted gobelin pattern.
Thursday, December 22, 2011
Lesson 2 complete UPDATE
Jane asked for a side by side photo of one and two and here it is. When the sun is out, I will do another. |
Lara is also this far in the pinks....check out her blog in the side bar....diet pepsi and xanax
Wednesday, December 21, 2011
Lesson 2, blocks 5 to 8
This is the rest of the blocks for Motif two. All are done in alternating Needle Necessities and the Marlitt. Each variation of stitches is worked to increase the light and texture variations....Next up will be the center motif and background on this motif
Monday, December 19, 2011
Lesson 2, step 2,3,4,
Step 2 is a pattern all in the NN overdyed and is an alternating pattern of two short and one long stitch.
Step 3 is a horiztontal satin stitch and is worked in alternating rows of the NN and the Marlitt...This is the top one in this motifi.
Pattern 4 is all done in NN and is worked in two steps. All the top left to center stitches are worked and then
the basketweave stitches are put in as step two.
Step 3 is a horiztontal satin stitch and is worked in alternating rows of the NN and the Marlitt...This is the top one in this motifi.
Pattern 4 is all done in NN and is worked in two steps. All the top left to center stitches are worked and then
the basketweave stitches are put in as step two.
Sunday, December 18, 2011
Center and more
Still in Lesson One, I did the center motif star pattern alternating between the Needle Necessities and the Marlitt with two strands of each over four threads.
Then, the instructions say to use the #4 Kreinik, mine is 3221, and work diagonal rows of Continental inside the blocks....I think this may be very hard to see, but is is very pretty!
Lara and I had a conversation about starting motif #2. I had started where I thought it should go, but was in the wrong place. After we chatted for a bit, we realized the instruction was a tad difficult, but figured out where to start this one. See the single thread between the #3 block of Motif 1 and the first design of block 1 in #2......that is now correct....after I did a bit of rip it! This pattern is first worked with the Needle Necessities and the cross stitch is put in and then the upright cross. The Marlitt is worked then with the upright cross first and the cross stitch second......does that make sense to you? It does make a difference in the stitches......
And....finally.....Motif #1 is 4 x 4 inches on the square.
Friday, December 16, 2011
Seven & Eight
Pattern 7 is done with both the over dyed and Marlitt in two strands. All of the Needle Necessities is laid in first and then the Marlitt is placed over the little divot created.
Pattern 8 is all done in the Needle Necessities and the pattern is alternated every 4 x 4 to create the effect
This then is all 8 of the patterns in this motif.....See the star shape formed by the box patterns? Now, you should also be able to see the color variations in the fibers caused by the Needle Necessities overdyed as well as the combination of the overdyed to the Marlitt. There is still a bit more to do to finish the motif and I will get busy....
Thursday, December 15, 2011
Four, five and six
Pattern 4 is worked with two strands of overdyed floss and the stitches alternate in each of the little blocks and you will notice her little "dimple" in the center of each.....
Pattern 5 is a larger diamond and is first worked with the over dyed floss and the upright crosses and the cross stitches on top of those are worked. Then 1 strand of Marlitt is used to place the smaller cross stitches in each row.
Pattern 6 was all supposed to be worked in overdyed floss......notice I said supposed to....I did the 4 x 4 cross stitches in the overdyed and then filled in the upright crosses with 2 strands of Marlitt and I like the shine. Since I am doing intense closeup shots for Lara and Becky, you are not seeing actual color variations in the shots at this point in the photos....I am in person, and when I am all the way around this pattern group, I will shoot a distance shot so you can see the variations.
Wednesday, December 14, 2011
Lesson One
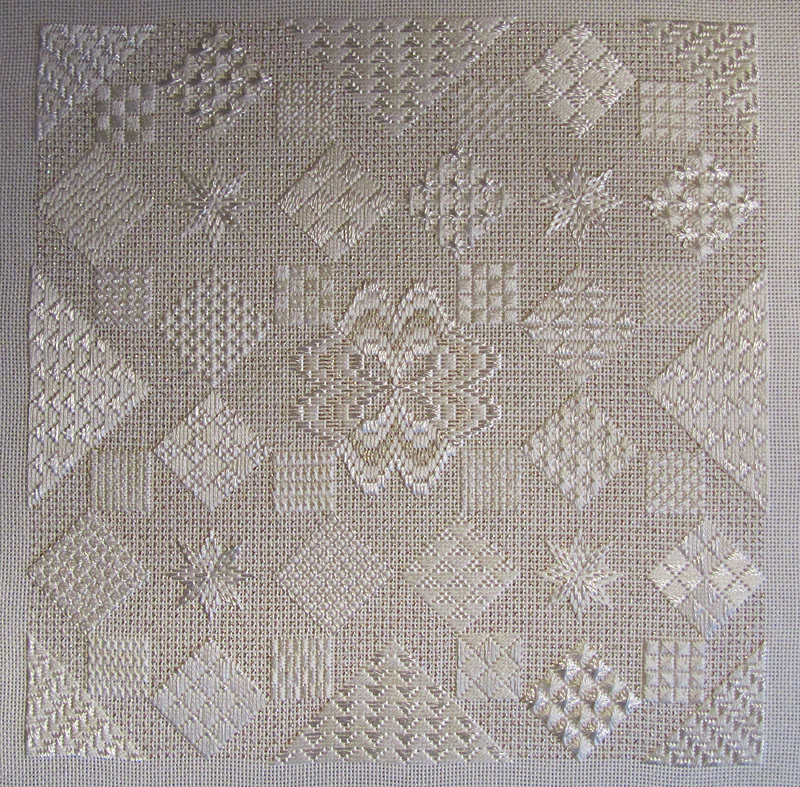
I have taken close ups of each of the areas I am working on in Lesson one. The first diamond is worked with two strands of the Needle Necessities overdyed and then two strands of the Marlitt for this pattern.
The next square is worked with two strands of the Needle Necessities. First a simple cross stitch is worked and each of the four legs are tied down as I worked across the row. You can see the very subtle color difference in the fiber by doing so.
The next diamond is also worked with two strands of each fiber in alternating rows laid so the sheen is reflective. Loretta always gives great instructions and a sample stitch pattern to ensure understanding.
This area is in the top left section of the canvas and you can see the very beginning of the star shaped inner pattern that is forming.
Lara and Becca are both going to be working this pattern as well.....Lara will be posting on her new blog....diet pepsi and xanax and there is a link to it on the side.....Welcome back to stitching Lara! And, by the way, Lara is a fabulous photographer so check out the links on the bottom of her blog to see some awesome photography......One of these days, I am going to stitch one of her photos!
Subscribe to:
Posts (Atom)