Monday, May 31, 2010

Fan update


I hope you had a nice holiday weekend! Tonight I worked on Lady Carolyn's fan and completed the Pavillion stitches i the second segment. I also started at the top opening of that same blade and began working a Waffle pulled stitch to create the lacy background. The pattern called for a Honeycomb stitch and I worked some of it but felt the design was too large for the small area so I switched to the Waffle that the designer called for in a couple of the other blades. I will see if I like this one better as I work along.

Friday, May 28, 2010

Tenting right along


I finished all the tent stitch in the single strand of Marlitt on the right straight ribbon out to the edge of the package. I then did the blue Marlitt in the bottom loop and also worked the gold around that loop. It takes a little time to fill in the tent stitches with a single strand but it is worth it as the painting shows through and that is what I wanted.

Thursday, May 27, 2010

Rosemary Stitch


I finished another band of the linen finish on the left and then started the Rosemary stitch band. There are three steps to this band. I am on the first one using Gloriana silk Monet's Pond and
doing squares of tent stitch.

Stitches in Sterling is available by class only at this per Nancy Cucci for those of you who are looking for it. I bought my kit from someone else that had taken the class but not stitched it.
Sorry about that but keep your eyes open as sometimes they pop up.

Oh, yeah, I dropped Ribbon and Roses off at the framer's and it should be ready in two weeks!

Wednesday, May 26, 2010

Some days you feel like a nut

Yup, that is it. I pulled out an old....not saying how old, just old.....WIP to resume stitching and replace the Ribbons and Roses piece in the rotation. I stitched for about thirty minutes. I looked at the alignment as it is a Bargello piece. Nothing was lining up......hhhmmmmm......what is the deal?? I kept looking and sure enough about 2/3 of what I had in was wrong! I found the mistake many rows back.......and started the ugly process of reverse stitching. DH casually asks....."Do you have to rip all that out because if you do, you will have nothing to show for today?! He got a dirty look and a semi-patient response of " I guess I will have to take it all out as it is wrong. Maybe that is why I never finished it." He says "why don't you just start all over?" I said " You know, I guess that would be smarter." I took the piece off the frame and went to the canvas stash to get another piece......no black 18 count in the stash. "Oh, no, I am out of canvas in that color!" I said and then he said "Why don't you just pick something else that is not finished and just work on that instead? It is not like you don't have anything to work on." He is lucky to still be breathing, and I have absolutely nothing to show you today! Tomorrow will be a better day. And, I will have to make a trip to the stitch shop....oh, poor pitiful me! LOL

Tuesday, May 25, 2010

Boxes

I worked on Stitches in Stirling at stitch group and have all the inside boxes completed. This now measures 3 x 3 inches. The camera is picking up the silver flecks in the canvas as well. Again, so far this is all Kreinik fiber and the inner boxes are stitched in #12.

Monday, May 24, 2010

Back to the rotation

An added comment from the Roses and Tassel piece. The beads on the tassel were stitched on and the crystal water drops are not the hot fix as I could not find that size at my store. They are ........gasp.....glued on with Ailene's Quick Dry! LOL

And then tonight I worked on the second section some more on the Diamond Pavilion stitch. Just a few more to go and the handle section will be complete. I am working with six strands of floss and laying each stitch. This is going fairly quick and I love doing this stitch anyway!

Sunday, May 23, 2010

Calling it done


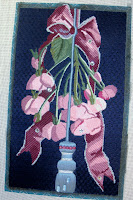
From this:
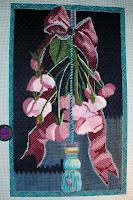
To this:
I made a lot of changes to this piece! I really like the basic elements of the piece but not all of the
extras, and that is why I deleted them. We all need to remember that we can alter a piece or a design or a pattern or a color to fit our taste or for that gift recipient.

I finished the bottom of the tassel by stitching the rest of the padding in place and then over-stitching the satin stitches with the six strands of Soie D Alger. I added in the last band of Kreinik silver. Then I added the five mauve beads to the tassel head and the three opal beads in the bottom section to replicate the painted canvas. Last I added the flat back crystals to replace the water droplets. I also took some more of my black paint to cover some of the turquoise in case it might be a problem for the framer. I thought about stitching more navy over it, but it was hard enough to cover and will let them work on covering up to or over the first thread if necessary. I will drop this off to them this week.

Saturday, May 22, 2010

More tassel work

I finished the stitching on the second level of the tassel and then added the padding for the bottom. I have started stitching that in place and plan to come back with a second layer on top of the very bottom section to round it out more than the previous two. I also added the silver Kreinik 1/16 ribbon horizontally between the first and second sections.

Friday, May 21, 2010

Back on track

I figured out what I did not like. I was laying in the three strands of the darker Soie D Alger and that was distracting the eye on the cord. I ripped that out and I went ahead and finished covering the upholstery cord and started working on the tassel itself. I have padded the top two sections and starting laying the horizontal threads on those sections. Now, I am satisfied again.
Thanks for the input everyone! I appreciate it!

Thursday, May 20, 2010

Not so sure

So I had gone by the fabric store and picked up the upholstery trim to use as the base for the tassel cord and planned on using Soie D'Alger in shades of blue to replicate it. I laid in six strands diagonally to cover and then come back with two strand in a darker shade to give it the appearance of the painted canvas. Now, I am not sure I like the colors with the rest of it and or my idea. Whatcha think?

Wednesday, May 19, 2010

Oh, what a relief it is!

I made it! The background is done! (Insert cartwheels, handstands, and backflips here!) It was down to the wire as to whether I would run out of the Impressions for the longest part of the stitches, but I had some left, along with a couple of cards of the navy Splendor. (Okay, so I no longer do cartwheels etc, but I would if I could!)

Tuesday, May 18, 2010

May I introduce the newest in the rotation?

Tuesday is stitching group night and the Roses & tassel is quite large to tote around, so I framed up the canvas and started on Stitches In Sterling by Nancy Cucci. Thanks to Ms. Cucci for her permission to blog stitch this piece. Doesn't this just look like a piece I would do? It is worked on 18 count white canvas with silver flecks.
The design begins in the center by creating the box using Kreinik 1/16 ribbon in 001HL. Next I moved on to filling in the center of that box with smaller boxes using Kreinik #12 in 001HL as well. There are several different stitches, beads and then the center jewel all adding glitz to this piece.

Monday, May 17, 2010

In the meantime

White I am stitching the rest of the background, I wanted to show you a Stitch n Zip by Alice Peterson. This cosmetic bag came with cotton floss in the kit, but the recipient is a lot glitzier so I switched the fibers to Kreinik metallics for the bow and Vineyard Silk Shimmer for the background. I lined the inside with a blue moire and gave this as a birthday gift. There are many wonderful designs and they are very reasonably priced too! You will see others I have in the future.
http://www.stitcherstreasures.com/AlicePeterson.htm

Sunday, May 16, 2010

Over on the right

Yielding to the pressure I am going to finish this piece. I am fairly close with just the right side of the tassel background to do and then the tassel itself. I looked for the turbo needles but could not find them so I stitched almost all of the right side with just one of my regulars. This leaves just a tiny bit by the bottom of the bow and the section next to the right side of the tassel. I am thinking one more night of background before the tassel work starts.

Friday, May 14, 2010

Out of rotation

Sometimes at the end of a long week, my brain goes into idle. Ever have that happen to you? So, I pulled out this piece and knew I could handle background stitching and would not have to make any decisions. I almost finished the left side tonight! You can see on the right side that I don't have that much of that side left to do either. DH thinks I should just finish this one and maybe I will just keep on going and see what happens.

Thursday, May 13, 2010

It is a box!


The Tooth Fairy Box came back from the finisher! It is 1 7/8 inches square. The top photo shows with the lid open, and then the padded inside, and finally the top. It is so darn cute! I can hardly wait to give it to the kids! The finishing was done by Michele at Stitchery Square in Camden, Maine. She came to me highly recommended and I see why! She does great work! Her website is: www.stitcherysquare.com. I hope you check it out as I could not be more pleased!

Wednesday, May 12, 2010

A little of this and a little of that

If you click on the picture above and enlarge it, you will see that I put a note on there about the Micro Ice. It outlines the Waffle stitches and hopefully you can see that in the area next to the words......or maybe a little better in this one below...it is the fuzzy stuff at the outside edges.
On the Gifts of Love piece by Sharon G: I am using the Marlitt because I had it in my stash. Judy recommends knotting it up by the needle and to use the DMC Satin Floss. I have not tried the Satin floss yet, but wanted to work the stash instead. I recommend you try both and see what works for you.

Monet's Garden: Jane asked if I knew about the finishing CD and I do and I have it. Monet's Garden by Terry Dryden was a gift from DH at Christmas. I received the full kit of canvas, threads, directions and CD for finishing. I ordered and received the frame too so we will be finishing this on the blog.

Tuesday, May 11, 2010

Fini!

I finished the outside rows by using the Frosty Rays, Gold Rush 18 and finally the Neon Rays. I then laid in the Micro Ice which is like flat garland. This fiber has to be worked in very short pieces as it has a tendency to shred. I also put the fiber in a larger needle, widened the holes with my laying tool and still ended up with a lap full of black pieces, but it looks pretty. Then you must go to the back and tack all the threads down. Since this tended to shred, some of the pieces I tacked down are bare of any of the black at all. Use this thread sparingly and try to couch it in place instead of laying it in as this called for.

I really lightened this a lot so you could see detail. It is a very black and shiny silver piece...a lot prettier than I can get it to show for you. It is worked on black canvas not gray but I wanted you to be able to see the detail.

Monday, May 10, 2010

Blade Two

First I finished the lavender on the roses by adding more French knots on top of the Sapphire using Hyacinth overdyed to create some variations in the lavender. I then started working the Pavillion stitch at the top of the blade working down with fives strands of DMC floss in 926. Since I did a lot of French knots last night and Pavillions on Monet's Garden, these almost stitched themselves!

Sunday, May 9, 2010

High cheekbone

I started under the eye at the top right doing my six strands of light gray DMC floss French knots and continued down to the left to just underneath the point of Otto's very dark eyeliner. It looks like he ran into the hair clipper on that last spot, doesn't it?

Friday, May 7, 2010

Bow loops

So, moving right along I did the bottom left bow loop and top right loop! Woohoo! Using a single strand of Marlitt in ecru and blue, I did this in basketweave stitch and then outline in Kreinik 004 color 002. All the while I am doing this stitching I am looking at the hearts deciding how I will stitch those too. I decided to finish the bow loops and side band before I will work the hearts in the top right section of the package.

Thursday, May 6, 2010

Pavillion Diamonds


The third band from the left is called Pavillion Diamonds. Six strands of Splendor are separated and laid in using Pale Yellow, Blue, Lavender and Pale Yellow Green with the Pale Yellow being the base and predominant color. I really like this as it goes quickly and is so pretty...such spring time colors!

Wednesday, May 5, 2010

Is that all?

I worked on the background on the left side. I started where the magnet is just about at the angle of the ribbon and worked down to the bottom of the ribbon and over to the tassel. Sure doesn't look like much for one sitting!

Tuesday, May 4, 2010

Rounding second, heading for home

The east and west sides are both complete, and the north and south are almost done. I started filling in the Frosty Rays first, the Gold Rush is the shiny parts, and then the last black is the Fyre Werks. Those last few fill ins will complete this piece

Monday, May 3, 2010

Lady Carolyn's Fan

I worked on Lady Carolyn's Fan tonight. I put in the French knots on a stick and regular ones in the center of the roses. I then worked on the French knots that comprise the lavender accents on the side. I did finish both centers but not all the lavenders. Do we notice a trend here? I promise not to work on French knots tomorrow! Sorry there isn't a picture, but there will be tomorrow night!

Sunday, May 2, 2010

Knot much going on

Yes, just more and more french knots! I switched to all six strands of the lightest color tonite on his face after doing a small segment on the top right of his head with the five light and 1 dark. A few more rotations and his face should be filled in.