I'm want to say "THANK YOU!" to Laura Perrin of Two Handed Stitcher for giving me a Brillante Weblog Award. What a lovely surprise....And what a great way to share our favorite blogs with other like-minded readers!
Here are the rules:
1. The winner can display this award on their blog.
2. Display a link to the person you have got the award from.
3. Nominate at least 7 other blogs that you like.
4. Set the links to the blogs on your blog.
5. Leave a comment on the blogs you have chosen.
Limiting it to seven is hard, and there are many wonderful blogs to read, don't you think? I'd like to list all of them... But I'll pick these favorites, among all the other favorites I have listed on the right (click on their titles on the right, to visit their blogs):
I always read:
Chilly Hollow
Possibilities
Laura Perrin-Two Handed Stitcher
Cyn Stitches
Stitching in Alamo
and several others that I still to add to the list!
Hope you check them out!
Thanks again, Laura!
Thursday, July 31, 2008
Wednesday, July 30, 2008
Lesson #2 Mystery Project
 While I am waiting to get threads for Betsy Bluebird, and the next steps on the Santa Heart, I picked up the Loretta Spears mystery project and finished putting in the cross stitches in the two strands of silver cord. This is in the bottom left and right rectangles. This completes lesson two of the piece.
mirror blog: http://360.yahoo.com/needleartnut
Tuesday, July 29, 2008
Betsy Bluebird-Updated.

Let me introduce you to Betsy Bluebird! She is a beautiful little girl! All three shades of blue are worked in tent using four plies of Mandarin Floss. I will give you a list of the colors tomorrow night. I am still waiting on the pinks to come in, but I have all the others waiting their turn.
UPDATE: Darkest blue: Mandarin 825, Medium: Mandarin 824, Light: Mandarin 823. White Splendor 800. Yellow Splendor 877.
mirror blog: http://360.yahoo.com/needleartnut
Monday, July 28, 2008
Santa Heart
As a member of the Yahoo Shining Needle Society, I am stitching some of the Janet Zickler Casey Santas! Janet has given me permission to blog another one of her great pieces! The group is at:
The group has just started the Santa Heart, and here is what he is going to look like:

And, here is where I am so far:
 First, I used DMC floss and padded the nose vertically and horizontally. Lastly, the third layer was added vertically again in Satin Stitch. Next, the eyes were worked using white DMC floss, Black Fyre Werks, and DMC black for the eyelash illusion. Step three was to work the face using DMC flosses in basketweave. Eyebrows were added using Designers Dream Wool and Stem stitching them in place. Last, again using Designers Dream wool, he has hair!
Don't you just love the twinkle in his eye already?
mirror blog: http://360.yahoo.com/needleartnut
Sunday, July 27, 2008
TaDa--Charlie Chickadee! UPDATED!


UPDATED: NEW PHOTOS!
I have finished Charlie Chickadee! As before, I cut my canvas, and used a foam craft material to wrap both the canvas and black satin backing around. I then glued the dowel and his feathers in place. Next I attached the black gimp around the outside to cover the edges. Unfortunately, I used a white background to take the photo, and did not realize the bottom feathers did not show up as they are white. I will re-shoot it tomorrow and change the picture then. Feel free to check back and see the difference!
mirror blog: http://360.yahoo.com/needleartnut
mirror blog: http://360.yahoo.com/needleartnut
Friday, July 25, 2008
The last stitches are in
 Tonight, I put in three (or more, here and there) rows of tent stitches all the way around the outside using four strands of DMC 414. I did not use the same fibers as I did in the piece. Sometimes, I do, sometimes I don't! I did this in a dark gray all the way around to follow the flow of a chickadee's feathers, as he then goes to black all over the back. I will using a black satin for his back. I will work on the finishing this weekend.
Cyn asked what is next? I have the Bluebird to do, but am still deciding on threads, so check back tomorrow to see what I will do in the meantime!
mirror blog: http://360.yahoo.com/needleartnut
Wednesday, July 23, 2008
Heeerrreee's Charlie!
Yes, Judy was right! He is a definate Charlie! Look at that mischievious face! And, after my "girl's night off" last night, I stitched a lot tonight.
I continued with the Snow-in white, and it is almost done. This piece will use the entire skein of Snow, in case you are planning to use the same fiber. I also filled in more of the lighter Soy Luster, across the chest and some at the bottom. I hope to finish the stitching tomorrow, but am not making any promises!
mirror blog: http://360.yahoo.com/needleartnut
Monday, July 21, 2008
He's got cheeks!

Tonite I filled in the cheeks with Caron's Snow. Then I moved to the right side of the breast, and filled in the lighter brown with two strands of Soy Luster Shadows #533 Travertine. Then darker tan color is # 545 Soy Luster Shadows, Cinnamon Toast. Soy Luster is also by The Pure Palette. Then I started the Snow on the breast. This is a little difficult to see in the photo, but if you enlarge it, you may be able to see a little better.
mirror blog: http://360.yahoo.com/needleartnut
Friday, July 18, 2008
As much as I can for now....
 I did get quite a bit done tonight! I filled in the top right grid of the bottom section with the Perle again. Then I started the rectangle on the left. All the ribbon thread is tacked down with the Perlee, and the cord cross stitches are started in the top left portion. You also see the Perlee thread up in the right rectangle.
Remember if you click on the photo, it will enlarge and you may be able to see more of the metallic as well as the wonderful light play achieved so far.
But, for now I am setting this aside for a bit.
I picked up the last fibers needed for the Chickadee and will begin him tomorrow.
Yes, Mom, there soon will be more!
mirror blog: http://360.yahoo.com/needleartnut
Thursday, July 17, 2008
Two more grids
 In the bottom section, the top left grid is done with two strands of the Marlitt, following the diagram pattern. Notice how the mirror grid on the top half was also worked with Marlitt.
The center bottom grid is worked in a snowflake design using first the Perlee and then two strands of silver cord create the cross stitches. This, then also mirrors the fibers on the top half in the same grid.
Tomorrow, I am picking up the last fibers I need to start the birds, and I will get one on the frame on Saturday.
mirror blog: http://360.yahoo.com/needleartnut
Wednesday, July 16, 2008
Second filled in grid
 This is the bottom grid, all sectioned off. The canvas on this piece measure 8 inches across and 11 inches down the side, so you have a perspective. The rest of this lesson will fill in the mirror sections of the top, but leaves the center blank. Still a mystery, isn't it?
mirror blog: http://360.yahoo.com/needleartnut
Tuesday, July 15, 2008
The mirror image
 I tried to post this last night, but blogger had problems loading the photo, so I had to try again this morning. So, I am now moving on to the bottom portion of the design. As you can see, I have worked the outside border in the upright cross stitch. I am using the Needle Necessities over-dyed floss again. This is going to be a mirror image of the top section, with a square in the center joining the two grids.
mirror blog: http://360.yahoo.com/needleartnut
Sunday, July 13, 2008
Completed Lesson #1

Lesson #1 is complete!
The bottom right grid was filled in using Marlitt, following the chart. This was worked from the outside in, taking care to make sure that the threads lay flat for maximum light play.
Next, the top rectangle was filled in, then the right hand. Both begin by laying Kreinik 1/16th ribbon from end to end. Then each area is couched down, using Perlee, following the charted design. Last, two strands of Kreinik cord are used to create the cross stitches in both rectangles.
Enjoy the sheen and color play in this area.
mirror blog: htp://360.yahoo.com/needleartnut
Saturday, July 12, 2008
Filling in the grids

The bottom left corner is filled in using overdyed perle, matching the overdyed floss, used to complete the grids. It is worked with one strand for the pattern. It really shines in person! the center pattern is stitched using Kreinik Perlee, working on the diagonal. Then I used Kreinik cord and worked a cross stitch over 2 x 2 threads in the center of each pattern. It, too, is really sparkly!
I peeked--the bottom right grid is going to be filled with Marlitt! Stay tuned!
mirror blog: http://360.yahoo.com/needleartnut
Friday, July 11, 2008
The center grid
 Tonight I filled in the center grids, using the Needle Necessities and the same stitch. Each of these areas will next be filled in using different stitches and fibers. This is about one half of the total design. As you now know, Loretta Spears did mystery projects. She would send her students, one lesson at a time, and give them about two weeks to stitch the lesson. Then the next one would appear in the mail. The first lesson gives you the material and fiber requirements and Lesson #1. No picture. We are still on lesson one!
mirror blog: http://360.yahoo.com/needleartnut
Thursday, July 10, 2008
Mystery #2
 This is the start of Loretta Spears Mystery Project #2, called Winter Reflections. It is worked on 24 count light blue Congress cloth. The first instructions are to use two strands of Needle Necessities Overdyed in color 112. As you can see, this is a very light overdyed in blue. The stitch is an upright cross and step one was to create the outline you see above. You will also see three additional crosses inside the outline. These will be connected in the next step.
 I hope you stay tuned to see how this progresses, as there is no picture to show you what the completed project is to look like!
mirror blog: http://360.yahoo.com/needleartnut
Wednesday, July 9, 2008
A Feathered Fatima!
 Here she is! LOL!
 First, I finished the back with some of the gold lame--she needs the glitz, don't ya know?--over some of the craft foam. I centered a piece of gold cording for the hanger and tucked in to the inside. Next, I got out the old Singer and sewed around all the sides, leaving the bottom open. I then turned it inside out and stitched the bottom shut. This apparently was the easy part! Sewing fluffy feathers on the sides was total fun--little fluffs of pink feathers float in the air, while I stab myself with a very sharp needle! But, we think she is beautiful and I know she is going to be welcomed in her new home.
As Jane says, thank goodness there wasn't glue and glitter involved!
mirror blog: http://360.yahoo.com/needleartnut
Tuesday, July 8, 2008
Details On Peach Delight
What, you say, is she talking about now? LOL
I have gotten some questions and wanted to answer them for all to read, instead of just in comments.
First, I forgot to list the Splendor color number for the center of my Peach (Pink) Delight. It is S813. Happy stitching to those of you who are starting this one.
mirror blog: http://360.yahoo.com/needleartnut
Monday, July 7, 2008
Peach Delight is framed!
 Here is the framed piece. This is a frame for a trivet, but I will be hanging it on my wall!
Back to stitching on feathers for Fatima!
mirror blog: http://360.yahoo.com/needleartnut
Sunday, July 6, 2008
Peach Delight is all stitched!
 I finished the eyelet stitches inside all of the bargello circles first, with a single strand of my Bravo.
Then, I placed a 1/2 inch ring on the center of the canvas and buttonhole stitched all the way around it, attaching it to the canvas. Next, another ring of buttonhols stitches to create the petal effect around the ring, all using four strands of Splendor. Next, I covered some 5 mm beads with two strands of the Bravo again. She suggested buttonholing all around the bead to attach it to the canvas. Instead, I just wrapped the beads and attached them that way. Next, using two strands of the Bravo, I created the rays around the outside. Then, using a single strand of the Kreinik, I made even more rays. Last, I attached the beads in the center of the flower and spilled them over the top. Below is a closeup of the center. I will frame this later on, and post the final photo for you.
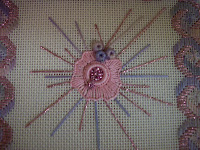
This piece was a lot of fun and a very quick stitch--about 8 hours! Just think of all the possible color combos on this one......fiber changes......
mirror blog: http://360.yahoo.com/needleartnut
Saturday, July 5, 2008
Peach Delight, Part II of Step One
I realized that I had not shown you the photo of Barbara Richardson's Peach Delight that was featured on the back cover of Needlepoint Now. Here is what her piece looks like:
After finishing the bargello pattern with the Kreinik, I then stitched in the corresponding bargello, to complete the outside, using Bravo. The pattern called for 124, but I used 129.

You will notice that is teal/turquoise in the card. I did not want that in the piece, so I cut out the section of that color, and only used the remaining part of the overdyed.

One thing you will hear me say time and again, is that it is your piece, so you are free to change colors, or even fiber. I always stitch a design I like, but I frequently change colors to fit the scheme of who is getting the piece, and where it may go.
mirror blog: http://360.yahoo.com/needleartnut
Thursday, July 3, 2008
Peach Delight
In the May/June, 2008 issue of Needlepoint Now, Barbara Richardson designed a box pattern called Peach Delight. Joyce Lukomski, Editor of Needlepoint Now, has given me permission to blog stitch this delightful pattern.
I am changing the peach colors to pink, and will let you know what I switched to as I go. The pattern calls for a bargello pattern as the first step. I switched to color 007 in the Kreinik #12 braid. This is what I finished so far:
I am changing the peach colors to pink, and will let you know what I switched to as I go. The pattern calls for a bargello pattern as the first step. I switched to color 007 in the Kreinik #12 braid. This is what I finished so far:
 The finished size is 6" x 6", so this will be a fairly quick stitch. Hope you can tag along.
mirror blog: http://360.yahoo.com/needleartnut
Wednesday, July 2, 2008
Christopher Cardinal
 Here is Christopher Cardinal, perched on his post! In case you are wondering, I backed Bobbie the Blue Jay with a blue moire, and added blue gimp, and Christopher here has a red velvet back and then red gimp.
Below is a photo of the boys just hanging out together:

As you can see, I am not making the stands all the same height. The next two will also be different heights so Mom can group them how she wants to.
mirror blog: http://360.yahoo.com/needleartnut
Subscribe to:
Comments (Atom)