 As a member of Cyberstitchers, I started a Biscornu for the upcoming Share a Stitch convention in June. They need several hundred of these and I am going to do my part and get a couple of these stitched and off to them. This is worked on linen and I am using two strands of Waterlilies Sandstone to do the stitching. I am working eyelet stitches connected by back stitches. I think I got a nice go on this tonight.
Wednesday, March 31, 2010
We interrupt this painted canvas.....
As a member of Cyberstitchers, I started a Biscornu for the upcoming Share a Stitch convention in June. They need several hundred of these and I am going to do my part and get a couple of these stitched and off to them. This is worked on linen and I am using two strands of Waterlilies Sandstone to do the stitching. I am working eyelet stitches connected by back stitches. I think I got a nice go on this tonight.
Tuesday, March 30, 2010
If it is Tuesday....
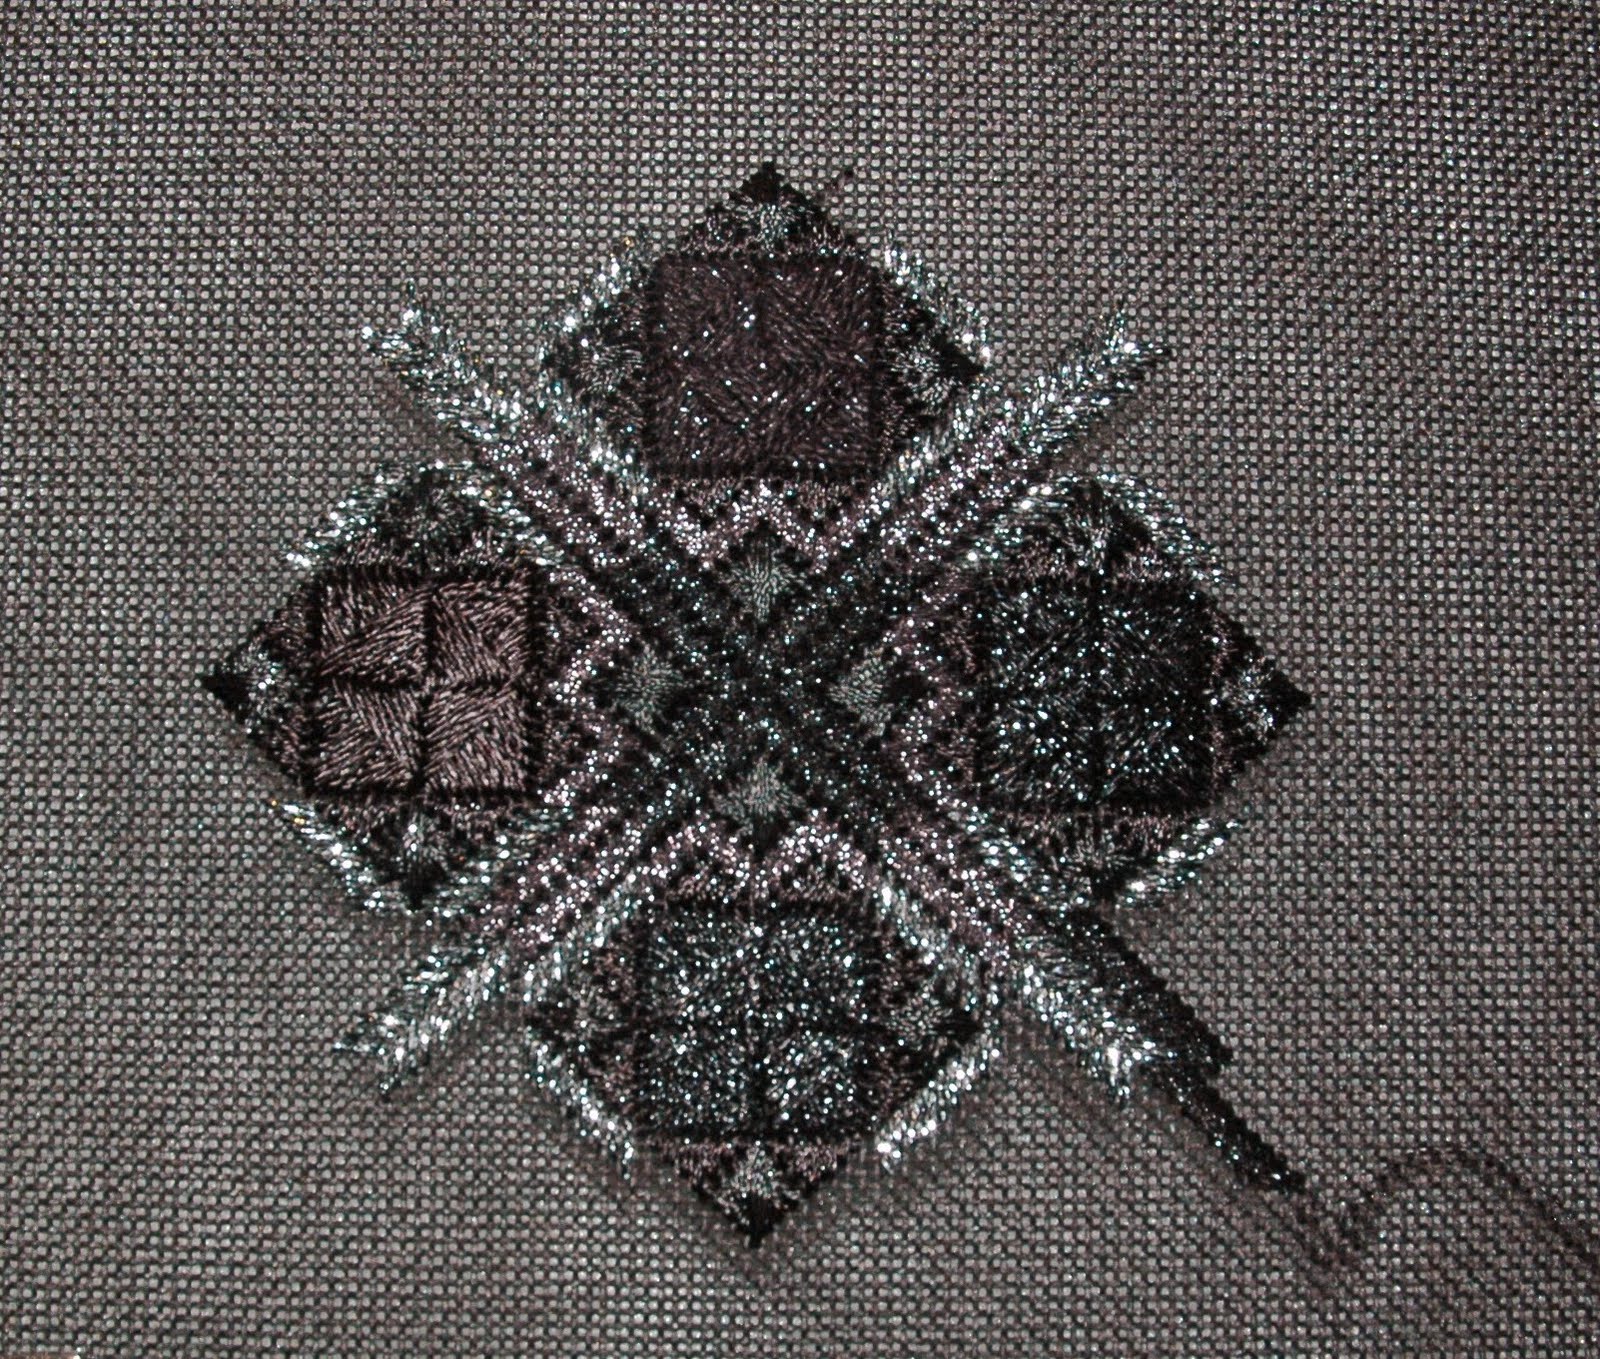 It is Black Onyx night! Tonight I finished up the Waffle Stitches. I used Snow, Silk Lame Braid and Patina on the last ones. I then used Gold Rush 18 and did more Bargello stitches extending the X out to all sides. Last I started more Bargello stitches using Frosty Rays. Even though we did a lot of talking and laughing I got a good bit accomplished!
Monday, March 29, 2010
Working in the center
 I did the navy stitches to the right of the left rose I finished last night and then moved over to do the center rose behind the tassel and the bud that is right below it. I see in the photo that I need to round out the edge of the left petal at the top as well as the bud itself. I also put in the rest of the petal on the right of the cord. See all the strands of thread hanging in parts of the petals? That is so I remember which parts of the petals are which colors! I could have written on my copy, but this just seemed faster! LOL
Sunday, March 28, 2010
Really close
 I did a really close up and lightened photo tonight showing I completed another rose and the bud below it on the left side. To the right of the rose, I see I forgot a bit of navy background compensation and I will remedy that tomorrow night. Jane asked about the background threads. The long stitches are three strands of the navy Impressions and the short stitches are six strands of Splendor all of which are being laid in place. The roses, ribbons and leaves are being worked in the Silk and Ivory fibers. And, thanks to Mary for the Sunshine blog award.....how nice of you!
Saturday, March 27, 2010
Right down the middle
 I did all the compensating stitches in amongst the vines and cord tonight, and then a tad more on the left side down to the next rose that is unstitched. I also lightened the photo a great deal so you can see the actual background pattern.
Friday, March 26, 2010
Calling it half
 I did more background tonight on the left side down to the rose I finished last night. So, I am calling the background half done! Yes, half done. Now, I hope I am right! I have been thinking about how I am going to do the tassel head and tassel itself. I looked for a real tassel that might work and look nice. Nope, there are not any within 15 miles of my house. What if I found a turned wood piece that I could paint and embellish and that would be three dimensional? Nope, not any within 15 miles of my house. Don't that just beat all? Okay, then, I will do my own. I know I am getting ahead of myself, but while I am stitching Boring Background my mind does have to figure these things out.
Thursday, March 25, 2010
A bit tipsy
 When I cropped the picture it looked fine, and when I uploaded it, it looks like I have been tipping a few! I really haven't, but I did change to my pretty colors and filled in the top left rose. The petals are each outlined first and then long and short stitches are filled in on each petal to create the flower. That is all being done with the Silk and Ivory fiber as well.
Wednesday, March 24, 2010
So Blue, Navy Blue
 I worked more of the navy blue background again tonight finishing the corner and down by the left hand bud. I have done enough of the background to earn working with another color tomorrow. Yippee! I received my Needlepoint Now magazine today and now I get to go and cruise through it....like I need any more ideas!
 Tuesday, March 23, 2010
Tuesday's Onyx
 I met with the stitching group and worked on Onyx again tonight. This is done in all black and silver designed by DeeBee. I put in the Rhodes stars all around with Ribbon Floss. I then used Vineyard silk and did one of the Waffle stitches. I really lightened this up so you can see the detail.
Monday, March 22, 2010
A bit more and a new toy
 Yes, I worked on more background and am almost to the top right corner! It is very difficult to see due to working navy on navy, but it is there. Jane asked me to comment on my new Parking Spot. I looked for this at Callaway when there and then at my LNS when I got back. My shop owner could not get it and said to order it and since I had seen it in Amy Bunger's newletter, I did. This is what the write up said:
"“It is getting hard to find a new tool that isnʼt just a
different version of the same old thing. The Parking Spot
is just such a unique tool, not just the same olʼ same olʼ.
The center “spot” is spring loaded and holds anything that
you snap between its jaws: BLT, Takobari, wooden laying
tool, or even a pencil or marking pen. The Black rim
around the parking spot is magnetized and will hold your
needles. Wow, how many times have you dropped your
wooden laying tool while expecting your fancy magnets to
grab and hold it?”
laying tool not included
The Parking Spot • $19 • measures 1½” round •" And, the above is a picture of mine. I ordered it and it arrived in 2 or 3 days at most! I really like it. I put the nickel next to it so you can get a sense of the size. I have my BLT in the center, and two needles on the rim. I can put my small scissors in it while stitching and it does hold them, but I really wanted it for the BLT and needles. It releases what is attached easily whether the needles or the laying tool even though the back earth magnet is about the size of the nickel and very strong. I have tried my wooden and ivory laying tool and it keeps them in place as well. Highly recommend it if you are wondering yes or no!
Sunday, March 21, 2010
Hmmmmmmmm
 I am hoping you can see what I did today.....First I ripped out the tent stitch next to the leaf on the top left by the cord as I did not like it and I restitched it to look like more leaves going in the opposite direction. Stepped back, looked, decided that was the right thing to do. The next part is the boring part.....I worked on the background on the left side and am trying to work up to the top to complete that corner. Then I plan to work background alternately with flowers and other parts of the piece to keep from getting Background Boredom.
P.S. I figured out how I am going to do the cord for the tassel too!!!
P.S.S. I am glad everyone loves the Hummer....he is pretty cool and there will be more stumpwork coming. Everyone enjoys watching how it is done and the pieces are wonderful to do
so there are others on the horizon, I promise!
Saturday, March 20, 2010
Airborn!
 Yes, he is officially flying! I cut out all the rest of the wired elements and attached all of them. The last thing was to do the wrapped stamens in the center of the two flowers. This is finished! Yippee!
Friday, March 19, 2010
The itty bitty wing
 This is the foreground wing for the Hummingbird. I should have put a ruler in this picture, but I did not think of that until now. The total length of the wire from tip to tip is 7 inches so that should help. Anyway, more of the silver chiffon is ironed onto the interfacing after the pattern was traced on it. I then tacked the wire to the outline shape and then button hole stitched over it. Next was to outline stitch all but the straight lines on the right and they were done with a single straight stitch. Finally, I took my tiny sharpest scissors and cut away the extra chiffon. How cute is that little thing!
Thursday, March 18, 2010
Hard to fly yet-Update!
 I finished the tail and outlined the feathers, took out the beak and redid it so that it was narrower, and did one wing. He can't really hover yet, but almost. The back wing is a piece of chiffon with iron on interfacing. It is then chain stitched to the linen and then that is wrapped. The lines in the wings are done with the outline stitch. Tomorrow I work on the foreground wing.
The silvery chiffon is ironed onto interfacing and then cut out close to the traced pattern lines. By chain stitching around the outside edge, it secures the piece to the fabric.
Wednesday, March 17, 2010
Back to the Hummer
 I put in the beak and then starting working on the tail. This is also working using a single strand of the silk in long and short stitches. I did not quite finish filling it in and I also have to do the outline stitches for the separations in a darker gray. Getting there though!
Tuesday, March 16, 2010
Onyx & Tuesdays
 I joined a new stitching group that meets on Tuesday nights! What a fun bunch of gals that all stitch right along and laugh while doing so! I decided to start Glitz & Glamour Onyx by DebBee's Designs as my project to take to this class. http://www.debbeesdesigns.com/GlitzGlamourIndex.htm
While the Onyx design is not on the site yet, there are several others in the Glitz line that are also in my stash, and you may want to cruise those. The design is worked blacks on black so this is going to be a fun one to get decent photos for you, but we will see how it goes. The design is started in the center and worked out. The four way bargello is worked with Frosty Rays in black, and then Rhodes diamonds are added in Neon Rays, also black. Next I did more Bargello using Fyre Werks in Black but that is showing up as a coppery color. The next bargello rows create the squares that are worked in black Neon Rays.
Monday, March 15, 2010
It is really hard to fly....
 without any wings or a tail, but I did manage to cut out this little guy, stuff and applique him to the linen. So temporarily he is suspended. Tomorrow he gets his beak and tail next. We are close to having this one in the finished category! I looked ahead at the instructions and the wings are also stumpwork so he can fly a little better.....then attaching the leaves and petals. I hope to have him done this week!
Sunday, March 14, 2010
Surprise!
 The purse came back! This is the purse flap that I won by listening to Gone Stitching Blog talk radio a while back. Every week Renee interviews someone new and there is a contest that you can enter, so I did! http://www.blogtalkradio.com/gone-stitching I finished stitching it and sent it back to them and Boots Bailey finished the purse with a black suede on the back, fully lined it with black moire, attached the shoulder strap and a tassel. I am thrilled with this and plan to carry it many times. There is a piece of silver lame behind the canvas to make all of the stitching pop. I had sent it along as I do this on a lot of pieces and everyone liked the idea.
  Today I moved on to the Hummingbird itself. All but the red throat is worked in single strands of split stitch. The throat is worked with 2 strands of red and one of green in long French knots to give it a very textured look. I am glad you all like Mr. Spider....he is kinda cute!
Saturday, March 13, 2010
Along came a spider
 Yes, I put in the spider web with a single strand of DMC fil for the inner web and three strands for the bottom edge. The spider is split stitched, then padded satin to smooth him out and a french knot for his head with tiny little legs. The calyx on the honeysuckle were split stitched around the outside. Then, a padding stitch is added and finally satin stitches for the top layer.
 Friday, March 12, 2010
Here they are!
 All of the little petals are done! I filled in the last two colors of the long and short stitch and as you can see they are all lined up under the leaves waiting to go on the piece. Next up is stitching all the sepals on the flowers.
Thursday, March 11, 2010
And a couple more
 I did the wire attachment and button hole stitched it to the muslin and started the long and short stitch on the last two flower petals. Okay, so he is right, they do sort of look like strawberries, but tomorrow I will fill in the last two colors of red on all four of them I hope. When they are attached to the piece, I know they will look like petals! LOL (Don't tell DH I said they look like berries!)
Wednesday, March 10, 2010
No, not strawberries

DH looked at what I got done tonight and said "that looks like strawberries" and after I punched him (not really!, LOL), I explained that these are the Honeysuckle petals that will be added to the background petals I previously stitched. "Oh, sure" he says and wanders off while I just realize he also calls what I do "sewing". Anyway, I first tacked the 28 gauge wire to the line drawn patterns on the muslin. Next up is to buttonhole stitch all the way around and then using the same color thread, I started to long and short stitch the top areas. I will be adding two more colors in each of the four petals.....see the other two at the bottom of the hoop.....which by the way is a one inch deep hoop that can be seriously tightened. The fabric needs to be tight as a drum while working on it. See the little dips on the petal on the left? I did that while I was securing my ending thread on the back. I will retighten my hoop before I start stitching tomorrow.
Tuesday, March 9, 2010
The Ribbon is Finished
 Since the Kreinik silver came in, I decided to work on this piece at my stitching group tonight. I was able to complete the silver on the right streamer and we are calling the ribbon stitching finished! I also did a little bit more of the background on the top left. I looked for a ready made tassel to attach to this piece this weekend, but nothing jumped right out at me. So, during menial mindless tasks, I have been pondering how I am going to do it, and I believe I have it figured out! Yippee! Stay tuned to watch it unfold. I may even get started on that this week, but I do want to get more of the left side background in and my fingers are ancy to get more of the roses done too.....so much to do!
Sunday, March 7, 2010
Posie petals
 I started with the back petals and did padded Satin stitch on all three of them. Then I did bullion stitches over the tops of them. Next the front three petals were all worked in the three shades of red using long and short stitches as well as padded satin. Tomorrow I will start on the wired petals that will get attached to the three foreground flowers. I am continuing to use one strand of Soie D Alger for all of the stitching.
Saturday, March 6, 2010
Toodling right along

 I finished filling in all the little leaves with the split stitch....aren't they so cute?!Next, I added thorns to the vine curving on the right up to the left. These are done by first making a lazy daisy stitch and then adding two strands of a darker Soie D Alger in the middle. Next you lay in the long lines that will become the flowers on the vine. After laying in all the long threads, I came back and Button Hole stitched each individual ones with three strands in three different red colors working from the top down.
Friday, March 5, 2010
Changing gears
 I am taking a little break from the Roses and Tassel piece. It is very large and I get a "crick" from working on it day after day. So I went through the WIP pile looking for a smaller piece, and this was what I chose! The Hummingbird and Honeysuckle piece by Luan Callery. I finished working on all the leaves around the bottom of the circle using a single strand of the different greens in Soie D Alger. Next came the stems holding them to the main vines.
 Next, I traced the Stumpwork leaves pattern on a piece of muslin. I cut some 28 gauge wire and attached the wires to the shape using the button hole stitch as you can see in the two on the right. I then added an outline stitch vein, in a darker color, and then filled in the rest of the vein with more of the outline stitch matching the color of the button hole stitch.
 Above the leaves you can see the flower petal shapes that will be worked later on!
Thursday, March 4, 2010
A Couple of things
 I finished the left center of the stems tonight. Then I put the knot in the center of the bow that I had forgotten to do. Then I moved over to the left side and started the Willow stitch there. I worked from the compensation over to ensure that my sides will match. I could have assumed that it would, but I don't like taking chances.
Also, I got an email from DMC and they now have a blog!
Please check it out! Great ideas, free patterns, give aways!
Wednesday, March 3, 2010
More on the right
 I worked more on the right side.....notice how it is starting to list that way! I stitched in another small rose to create the needed balance and then filled in the background down to that point. It does not look like much but it does take some time to get long and short stitches filled in even with the Silk and Ivory. I do outline the petals in split stitch first and then come back and fill in the stitches on each petal.
Tuesday, March 2, 2010
Here and there
 I worked the right side down almost to the bud as I also have a rose to insert here. I then moved over and worked a piece of the background in amongst the right side of stem. Last, I worked the petals on the rose in the middle on the right....a little here....a little there.
Good news however! Rene' called from Gone Stitching and they have the purse back from the finishing by Boots Bailey and they are going to take some photos and then send it on to me! I can't hardly wait!!
Rosebuds and Background
 Since my Internet was not working last night, I had to wait until this morning to post the progress. I worked on the right side in the Willow Stitch some more. I also stitched in the three rose buds. I continued to use the Silk and Ivory threads and am working in long and short stitches after outlining the outside. I added a bud on the top right where I had painted out the yellow rose and you can see the stem of another rose that I will add back in the same pink tones of the roses.
Subscribe to:
Posts (Atom)